My Tech Scrap
Flipkart.com

Translate

Share |

Wednesday 30 December 2009

Vista - Check Disk Log Location

The Vista check disk log can be found as follows: Go to Start, Control Panel,
Administrative Tools, Event Viewer, Windows Logs, Application. Scroll down
the Application Events looking for Wininit in the Source Column. You can also
use Find in the right column to help locate each Wininit entry. Open Wininit
and there it is. Here is one of my Wininit logs:

Checking file system on C:
The type of the file system is NTFS.

A disk check has been scheduled.
Windows will now check the disk.
207168 file records processed. 96
large file records processed. 0 bad file
records processed. 0 EA records processed.
44 reparse records processed.
256944 index entries processed.
0 unindexed files processed. 207168
security descriptors processed. Cleaning up 26
unused index entries from index $SII of file 0x9.
Cleaning up 26 unused index entries from index $SDH of file 0x9.
Cleaning up 26 unused security descriptors.
24889 data files processed. CHKDSK is
verifying Usn Journal...
35062672 USN bytes processed. Usn
Journal verification completed.
CHKDSK is verifying file data (stage 4 of 5)...
207152 files processed. File data
verification completed.
CHKDSK is verifying free space (stage 5 of 5)...
7032339 free clusters processed. Free
space verification is complete.
Windows has checked the file system and found no problems.

70353888 KB total disk space.
41824856 KB in 152426 files.
85108 KB in 24890 indexes.
0 KB in bad sectors.
314568 KB in use by the system.
65536 KB occupied by the log file.
28129356 KB available on disk.

4096 bytes in each allocation unit.
17588472 total allocation units on disk.
7032339 allocation units available on disk.

Internal Info:
40 29 03 00 af b4 02 00 99 a6 04 00 00 00 00 00 @)..............
88 00 00 00 2c 00 00 00 00 00 00 00 00 00 00 00 ....,...........
e0 64 e3 76 00 00 00 00 50 23 9f ff 00 00 00 00 .d.v....P#......

Windows has finished checking your disk.
Please wait while your computer restarts.
http://www.vistax64.com/vista-performance-maintenance/177478-check-disk-log-location.html

How to install iPhone applications using Cydia?

  • Would you like to install unofficial applications to your iPhone?
  • How to use the Cydia app?
There are a lot of official apps, but there also exists unofficial apps and you can't install them using App Store. Official apps must respect some apple rules, but unofficial must not. You can also install a lot of winterboard themes, repairs and improvements, language translations, ringtones etc using Cydia. Cydia looks user-friendly. You can easy search app, download and install it.

1. What do you need?

  • You need the Cydia app. So your iPhone must jailbreaked.
  • You need an internet connection. Faster Wi-Fi connection is better.


2. How to install applications using Cydia?

You can find your app in sections or using the search function.
  1. Start the Cydia app.
  2. Search your app and then click on it.
  3. Read the informations and instructions for installing app. Then click on "Install" button.
  4. Now you should see amount of data to download from internet. Click on the "Confirm" button.
  5. Wait for installation complete. Click on "Return to Cydia" button.
  6. Now the app is installed and you can find it on your desktop. If you install for example ringtones, you will find it in your ringtones settings.
Start Cydia Select user Cydia Sections Search your app Click on install Confirm the install App is installed click on return to cydia

3. How to uninstall applications using Cydia?

  1. Click on the "Manage" icon in the bottom, then click on "Packages".
  2. Find the app for uninstall in the list of installed apps. Click on it.
  3. Clico on "Modify" button and choose "Remove".
  4. Confirm the uninstall by clicking on "Confirm" button.
  5. After app is uninstalled click on"Return to Cydia".
  6. Now app is removed from your iPhone.
Select packages Select app fot uninstall Click on modify Click on Remove Confirm the uninstall Uninstall complete, click on return to cydia
http://en.vimjak.cz/iphone/how-to-install-iphone-applications-using-cydia

Monday 28 December 2009

Mac OS X: Starting up in Safe Mode

Summary

Learn how to start up in Safe Mode.

Products Affected

Mac OS X 10.4, Mac OS X 10.3, Mac OS X 10.2, Mac OS X 10.5, Mac OS X 10.6
To start up into Safe Mode (to Safe Boot), do this:
  1. Be sure the computer is shut down.
  2. Press the power button.
  3. Immediately after you hear the startup tone, hold the Shift key. The Shift key should be held as soon as possible after the startup tone but not before.
  4. Release the Shift key when you see the gray Apple icon and the progress indicator (looks like a spinning gear).
During startup in Mac OS X v10.4 or later, you will see "Safe Boot" on the login window, which appears even if you normally log in automatically.
During startup in Mac OS X v10.2 through v10.3.9, you will see "Safe Boot" on the Mac OS X startup screen.
To leave Safe Mode in any version of Mac OS X, restart the computer normally, without holding any keys during startup.

Additional Information

Advanced: If you can't Safe Boot with a keyboard
If for some reason you can't use the keyboard method to start in Safe Mode (the keyboard is missing or not working, for example), and you already have remote access to the computer, you can configure the computer to startup in Safe Mode via its command line
  1. Access the command line by either opening Terminal remotely, or by logging into the computer from another via SSH.
  2. Execute the following command in Terminal or on the command line:

    sudo nvram boot-args="-x"

    (If you want to start in Verbose mode as well, use sudo nvram boot-args="-x -v" instead )
     
  1. After using Safe Boot, to return to a normal startup, execute this command in Terminal or the command line:

    sudo nvram boot-args=""
Ref >> http://support.apple.com/kb/HT1455?viewlocale=en_US

Monday 14 December 2009

Create Free iTunes Account without Credit Card

Summary

To create an iTunes App Store account without a credit card please follow the steps below. In order to create an account without a credit card, you must make sure you are in the App Store, not the iTunes Store.

Note: These steps are for creating an iTunes App Store account on your computer. 

If you already have an account, choose Store > Sign Out.

Pick your country from the pop-up menu at the bottom of the iTunes Store homepage.
If your country also has an iTunes Store, you'll need to navigate to the App Store by clicking on the App Store link from the menu on the left. 


Important: Before proceeding to the next step, you must purchase a free application by clicking 'Get App'.


Click create new account.


Click Continue.
You'll need to read and agree to the iTunes terms and conditions, make sure you check the box next to where it says "I have read and agree to the iTunes Terms and Conditions." Click Continue.
Enter your email address, create your password, continue to create and answer your security question, then enter your birthday. Click Continue.
Select None as the payment option.

Continue to fill out the required name and address fields.
You'll then see a screen that says 'Verify your Account'. Click Done and then check your email for a verification email from iTunes Store.
Open the email and click on the link enclosed in the email to activate your account.


Once you click on the link, iTunes should then prompt you to sign in with your account name and password.
You'll then see the below "Congratulations" screen. Click Done to be taken to the App Store home page.

iPhone not showing wireless network, wifi issue with iphone 3g and 3gs

Go to

1. Settings

2. General
3. Reset…
4. Reset Network Settings

This will wipe all your WiFi settings out and restart the phone. When it starts up again, you’ll have to reenter passwords for the WiFi networks you use. Ever since the reset, my phone seems to join my network normally.

Saturday 12 December 2009

Free Video Calls on iPhone using Fring

World’s first Video Calls on the iPhone – only with fring!

fring brings the first ever internet video calls on the iPhone/iPod touch just in time for the holidays!

LONDON, December 01, 2009. fring, the multi-award winning mobile application that lets users communicate and share web-based experiences from their mobile devices, today announces the first ever mobile video calls over Internet for the iPhone.

These holidays, only iPhone and iPod touch users with fring can talk with and also see their family and friends on Skype or fring, from anywhere, for free, over Wi-Fi internet connection. This is the first video over internet service on the iPhone or iPod touch.

This video feature is embedded within the fring application that enables free voice calls from the iPhone and iPod Touch to other fring users, Skype and GTalk buddies as well as friends on regular phone lines via Skype-Out and hundreds of popular SIP services. fring users can live chat, update profiles, share files and talk with friends from several Instant Messaging services like MSN, AIM, GoogleTalk and Skype, in addition to interacting with popular online social networks like Twitter, all from one integrated fring contact list

Avi Shechter, Co-Founder & CEO of fring: “Leveraging excellent video capabilities on the iPhone and iPod touch together with our open internet and social environment, we’re bringing together families and friends these holidays, wherever they are…” Shechter continued, “We were the first to bring mobile voice over internet (VoIP) to mobile devices, the first to bring iPhone/ iPod touch users the choice to make free Internet calls, the first to enable cost-saving mobile twitter over internet, and now we’re proud to continue leading the field of rich mobile-internet communication by bringing users the world’s first fring video calls over internet for the iPhone and iPod touch.”

The new fring version with video calls support is currently available to users with iPhone/ iPod touch OS 3.0 (only incoming video-stream available, due to the location of the camera) and selected Nokia Symbian S60 devices (2-way video streaming is available) . In addition, fring supports thousands of handsets on multiple platforms including Symbian S60, Android, Windows Mobile, J2ME and Linux devices.

Ref >> http://www.fring.com/newsroom/video_calls_on_iphone.asp

Tuesday 8 December 2009

Free Mp3 Wma Converter

Free MP3 WMA Converter enables you to convert your MP3, WMA, OGG, AAC, M4a, MP4, Ape, Ac3, FLAC, WAVE files:

  • Mp3 to Ogg, Mp3 to Wma, Mp3 to AAC, Mp3 to Wav...
  • Wav to Mp3, Wav to Ogg, Wav to AAC, Wav to Wma...
  • Wma to Mp3, Wma to Ogg, Wma to AAC, Wma to Wav...
  • Ogg to Mp3, Ogg to Wma, Ogg to AAC, Ogg to Wav...
  • AAC to Mp3, AAC to Wma, AAC to Ogg, AAC to Wav...
  • Ape to Mp3, Ape to Wma, Ape to Ogg, Ape to Wav...
  • Flac to Mp3, Flac to Wma, Flac to Ogg, Flac to Wav...
  • M4a to Mp3, M4a to Wma, M4a to Ogg, M4a to Wav...
  • Ac3 to Mp3, Ac3 to Wma, Ac3 to Ogg, Ac3 to Wav....

And even more possible conversions !

You can convert Itunes audio files (m4a format) free of charge in MP3, WMA, OGG…! Tags's editor integrated (V1 and V2). Copy your audio CDs very rapidly thanks to “Free CD Ripper”. Simplicity at the service of efficiency.

Download

Read More >>

Merge MP3

Download
Download the latest release here. Simply unzip MergeMP3.exe from inside the ZIP file, place it into any directory and execute it.

It is often necessary to merge multiple sound files into one recording. This need may arise for various reasons: merge ripped CD tracks into one, combine multiple chapters of an audiobook, etc. There are many great programs to achieve this, but very few of them are actually free. I've discovered that while all of these programs perform the task well, they also contain lots of other features, making them too complicated for the tasks. This is why when I needed the plain vanilla merging utility, I could not find one that was free - and decided to write one myself. The added benefit of writing one myself, of course, is that it has exactly the features I need - and none that I don't. When it was done - I decided to give it away for free - to alleviate some of the pains I had.

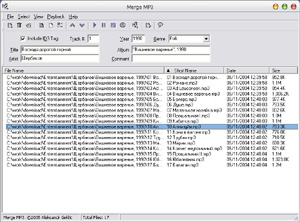
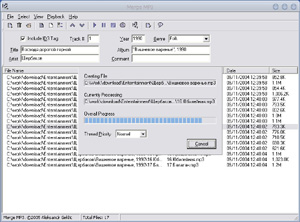
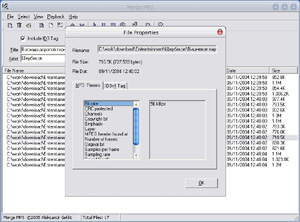
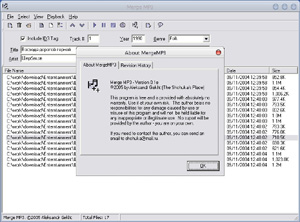
Below are some screenshots of the program. Click on each image for a large picture.

[Back to Top]


Program Features
The features of the program are not numerous - but everything you need is here:

  • Merge as many files as you like - no limitations by size, length, or number.
  • Sort files to be merged by filename (with or without directory), date/time or size.
  • Optionally write ID3v1 and ID3v2 tags into the merged MP3 file.
  • Optionally write VBR frame into the merged file - useful when merging files with different bitrates.
  • View detailed information about MP3 files to be merged, including MPEG header information and ID3v1 and ID3v2 information.
  • Choose to use ID3 tag from any of the files to be merged to write into the target file.
  • Display an image embedded into the MP3 files.
  • Play MP3 files from the list to be merged.
  • No complicated installation - simply unzip the program and run from any directory.
  • Very intuitive interface.
  • Very fast merge speed.
  • It's absolutely FREE!

Download
Download the latest release here. Simply unzip MergeMP3.exe from inside the ZIP file, place it into any directory and execute it.

Read More >>

Thursday 3 December 2009

Jailbreak/Unlock Your iPhone With BlackRa1n

How To Make An IPhone App.

Recurring Revenue ::: SMS Worldwide :::. 

Make Money With Cell Phones!

Easy Home Surveillance.

Iphone Repair Guide.


How to Jailbreak Your iPhone Using BlackRain:

Step 1: Update iTunes to the latest version available and reboot your computer.
Step 2: Download BlackRa1n from http://blackra1n.com/ by Geohot (http://iphonejtag.blogspot.com)and install it, then reboot your PC (note that rebooting is not necessary but I always do this as a precaution).
Step 3: Plug your iPhone to your computer and launch BlackRa1n. Click on “make it ra1n”.
Some times it may rise errors like, "ASL.dll was not found" or "CoreFoundation.dll was not found" like that, you can solve it by just copying all ".dll" files from "C:\Program Files\Common Files\Apple\Apple Application Support" to the folder containing "blackra1n.exe".
make it ra1n
Step 4: Your iPhone will now enter recovery mode. The regular recovery mode image on your iPhone will be replaced by a picture of GeoHot.
entering recovery
Step 5: BlackRa1n will run on your iPhone and then it will reboot.

done
A pop up will show up asking you to donate. If you successfully jailbreak your iPhone, I suggest you send $5 or $10 to GeoHot.

How To Make An IPhone App.

Recurring Revenue ::: SMS Worldwide :::. 

Make Money With Cell Phones!

Easy Home Surveillance.

Iphone Repair Guide.

Step 6: Once your iPhone reboots, you will notice a new icon on your springboard. This is BlackRa1n. Now make sure you have internet connection and launch BlackRa1n on your iPhone.
blackra1n installed
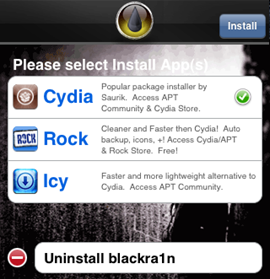
Step 7: Choose what installer applications you want to install on your iPhone and then tap “Install”. I suggest only installing Cydia but you may install them all if you want to.
blackra1n app
BlackRa1n will download and install the selected applications.
Step 8: Once done installing, your iPhone will respring and you should see your installer app on your springboard.
blackra1n cydia installed
Step 9: Once your installer app (Cydia in our case) is installed. You can safely uninstall BlackRa1n by launching the app and selecting “uninstall balckra1n”.
uninstall blackra1n
Step 10: Reboot your iPhone. You’re done!


Ref >> http://www.iphonedownloadblog.com/2009/10/11/jailbreak-iphone-blackra1n-tutorial/


How To Make An IPhone App.

Iphone Repair Guide.

Recurring Revenue ::: SMS Worldwide :::. 

Make Money With Cell Phones!

Easy Home Surveillance.